Helix, language servers, and Python virtual environments
How to get the text editor Helix working with Python language servers and virtual environments. Plus a guide to Helix’s LSP-based features.
Helix is a neat little vim-like, modal, terminal text editor (written in Rust!) with a low-config, good-defaults approach and modern features.
modus_operandi_deuteranopia,
one of Helix’s builtin themes. It’s a port of the
modus themes for Emacs.
One of Helix’s headline features is Language Server Protocol (LSP) support for features like autocomplete, diagnostics (i.e. in-editor linting and type checking), go-to-definition, find-all-references, showing docstrings on hover, code formatting, etc.
LSP servers for many programming languages provide code intelligence features to LSP clients like Helix. A single LSP server can be used by many different editors, and a single editor can use many LSP servers. As we’ll see Helix can even use multiple servers for the same language at the same time and combine the results.
Helix comes out of the box with pre-configured support for many language servers. But it doesn’t quite “just work”: you still have to install the language servers themselves, Python virtual environments are still an obstacle, and you also need to learn about Helix’s LSP-based features and how to use them.
I’ve been trying out Helix and took notes as I configured and tested its LSP support. This post will hand-hold you through installing Helix, installing the Python language servers that Helix supports, and getting it all working with your virtualenvs.
We’ll then do a little tour of Helix’s LSP-based features and how to use and configure them.
Install Helix
It’s really easy to install an up-to-date version of Helix, see Helix’s installation docs for all the different install methods available. I’m on macOS these days so I installed Helix using Homebrew. First install Homebrew if you haven’t already, then use Homebrew to install Helix:
$ brew install helix
That’s it!
One stumbling block: the command to launch Helix isn’t helix, it’s hx. So
to launch Helix just run:
$ hx
(If you find you keep forgetting this you might consider adding a helix →
hx alias to your shell config. I can see why they did it though: hx is very
short and easy to type.)
Install uv
Helix’s language server support comes pre-configured and enabled out-of-the-box, but you still need to install the actual language servers yourself.
In this post we’re interested in Python language servers and the best way to install Python tools nowadays is by using uv, so we’ll first need to install uv. Fortunately this is also really easy. There are various ways to install uv, I’ve already used Homebrew to install Helix so I’ll use it again for uv:
$ brew install uv
Install the Python language servers
You can see which language servers Helix supports out-of-the-box for each language on the
language support page in Helix’s docs
or by running hx --health:
$ hx --health python
Configured language servers:
  ✘ ty: 'ty' not found in $PATH
  ✘ ruff: 'ruff' not found in $PATH
  ✘ jedi: 'jedi-language-server' not found in $PATH
  ✘ pylsp: 'pylsp' not found in $PATH
Configured debug adapter: None
Configured formatter: None
Tree-sitter parser: ✓
Highlight queries: ✓
Textobject queries: ✓
Indent queries: ✓
As you can see, Helix is reporting that it’s configured to use ty, ruff and Jedi (also pylsp, but we’re ignoring that one) but is saying that none of them are installed. Let’s fix that…
$ uv tool install ty
Resolved 1 package in 86ms
Installed 1 package in 4ms
 + ty==0.0.1a22
Installed 1 executable: ty
$ uv tool install ruff
Resolved 1 package in 77ms
Installed 1 package in 3ms
 + ruff==0.14.0
Installed 1 executable: ruff
uv tool install?
uv tool install is uv’s equivalent of pipx: it installs each tool into its own isolated virtualenv
(the virtualenvs are located in ~/.local/share/uv/tools/ on my machine, the uv tool dir command will tell you where they are on yours)
and puts symlinks to each tool’s executables on your $PATH
(the symlinks are in ~/.local/bin/ for me, uv tool dir --bin will tell you where they are for you).
uv tool will check whether the bin dir is on your $PATH and complain if it isn’t,
and if that happens you can use uv tool update-shell to fix it.
You can use commands like uv tool list,
uv tool upgrade, and uv tool uninstall to manage your installed tools.
Jedi doesn’t come with its own builtin language server so we have to install a third-party one called jedi-language-server instead (jedi-language-server is recommended in Jedi’s docs):
$ uv tool install jedi-language-server
Resolved 11 packages in 135ms
Installed 11 packages in 30ms
 + attrs==25.4.0
 + cattrs==25.3.0
 + docstring-to-markdown==0.17
 + importlib-metadata==8.7.0
 + jedi==0.19.2
 + jedi-language-server==0.45.1
 + lsprotocol==2023.0.1
 + parso==0.8.5
 + pygls==1.3.1
 + typing-extensions==4.15.0
 + zipp==3.23.0
Installed 1 executable: jedi-language-server
hx --health will now report that the language servers are installed (again, we’re ignoring pylsp):
$ hx --health python
Configured language servers:
  ✓ ty: /Users/seanh/.local/bin/ty
  ✓ ruff: /Users/seanh/.local/bin/ruff
  ✓ jedi: /Users/seanh/.local/bin/jedi-language-server
  ✘ pylsp: 'pylsp' not found in $PATH
Getting it working with your virtualenv
At this point the language servers will just work in Helix. It’s that simple: all you have to do is install the language servers and they just work. At least for the standard library.
But the language servers won’t know about your project’s third-party dependencies:
you’ll get unresolved-import diagnostics about all your third-party imports,
code completions won’t work for third-party libraries, etc.
To fix this we need to create a virtualenv
in your project’s root directory and install
your project’s dependencies into it.
In my case my project’s dependencies are in an old-school requirements.txt
file so I need to create a virtualenv and install that requirements file into it:
$ uv venv  # Creates a virtualenv at .venv
Using CPython 3.11.11
Creating virtual environment at: .venv
Activate with: source .venv/bin/activate
$ uv pip install -r requirements.txt  # Installs requirements.txt into .venv
For ty and Ruff that’s all you need to do: they automatically discover virtualenvs in .venv folders.
Just launch hx from your project’s root directory.
Teaching Jedi where your virtualenv is
Jedi needs a bit more help: it doesn’t know about the location of the virtualenv. There are several ways to get it working:
-
Activate the virtualenv
One solution is to just activate the virtualenv in your shell before launching Helix:
$ source .venv/bin/activate
$ hx
That works, but there are other options for people like me who don’t like to activate virtualenvs…
-
Use
uv runAnother option is to launch Helix with
uv run:$ uv run hxuv runlauncheshxwithin the.venvvirtualenv without having to activate the virtualenv in your shell first.It might also be possible to configure Helix to use
uv run
jedi-language-server
as the command to run jedi-language-server, then you could just runhxinstead of having to douv run hxall the time, but I didn’t try it. -
Use a
languages.tomlfileIf you don’t want to use
uv runeither there is a third option: create a.helix/languages.tomlfile in the root of your project with these contents:# .helix/languages.toml [language-server.jedi] config.workspace.environmentPath = ".venv"Now Jedi will know about your virtualenv without needing to activate it: just launch
hxwith your project’s root directory as the current working directory, which you already need to do for ty and Ruff anyway.What’s going on here is that jedi-language-server has a
workspace.environmentPathoption for setting the virtualenv. This option has to be set via the Language Server Protocol’s initializationOptions, and theconfigoption is how you tell Helix to send initializationOptions to the language server, soconfig.workspace.environmentPath = ".venv"tells Helix to pass theworkspace.environmentPath = ".venv"initialization option to jedi-language-server.
Limitation: multiple virtualenvs
My project has a requirements.txt file that contains all the production requirements
that get installed into the Docker container that actually gets shipped to production.
And it has a tests.txt file that contains everything in the requirements.txt file
plus additional requirements for running the tests (pytest etc).
tests.txt is what gets installed into the virtualenv that the tests run in.
So which requirements file should I install into the .venv virtualenv that ty, Ruff and Jedi are using in Helix?
If I install requirements.txt into .venv then the language servers won’t know about my test dependencies.
Whenever I’m editing a test file I’ll get diagnostic warnings about every import pytest,
autocomplete won’t work for pytest stuff, etc.
But if I install tests.txt into .venv then the language servers will think that
my test dependencies are fair game in production files.
When editing a source code file I could import pytest and nothing would complain,
even though that will absolutely fail (and take down production) if it gets into
the Docker image and deployed.
There’s no right answer.
When editing a production source file the language servers need to use a virtualenv
that has only requirements.txt installed in it.
When editing a test file they need to use a virtualenv with tests.txt installed.
The problem isn’t limited to tests: it rears its head in any kind of project-with-multiple-virtualenvs situation, or when editing multiple projects at once in a single instance of Helix.
As far as I know there’s currently no solution to this. And I’m not sure it’s Helix’s problem. It’s probably the language servers themselves that need to support selecting different virtualenvs depending on which particular file is being edited. A single virtualenv per project or per editor/language server instance isn’t enough to get it completely correct.
Using Helix’s language server support
Alright, we’ve gone through the trouble of getting it all working. Now let’s take a tour of Helix’s LSP-based features…
Autocomplete
The one that everyone wants and the only language server feature that really matters: “intelligent” autocomplete suggestions that know about your programming language, your code, and your dependencies. They look like this in Helix:
Autocomplete suggestions usually appear automatically as you type, but if you need to summon the autocomplete menu manually you can do so with Ctrl + x in insert mode.
There are several pairs of keybindings for moving up and down within the autocomplete menu: Tab and Shift + Tab, Ctrl + n and Ctrl + p, and ↓ and ↑.
Enter accepts the current autocomplete suggestion and closes the autocomplete menu but you don’t usually need to do this: just keep typing.
Esc or Ctrl + c closes the autocomplete menu without accepting any completion.
When language servers collide
In our case autocomplete suggestions are provided by both ty and Jedi (Ruff doesn’t provide autocomplete). This means that you’ll get two autocomplete suggestions for the same thing, one from ty and one from Jedi:
log.warning:
one from ty and one from Jedi.
Jedi thinks log.warning is a function,
ty calls it a method.
They each render the signature and docstring differently too.
ty and Jedi differ in what information they show about each autocomplete suggestion in the popup window to the right, and they’ll also differ in what autocompletions they’re capable of suggesting, so you may want to keep both.
Alternatively you can disable autocompletions from one of the language servers
while still allowing that language server to provide other features.
For example to disable autocompletions from ty
create either a ~/.config/helix/languages.toml file for global configuration
or a .helix/languages.toml file in your project’s root directory for per-project configuration,
and add the following contents:
# languages.toml

[[language]]
name = "python"
language-servers = [
  {name = "ty", except-features = [ "completion" ]},
  "ruff",
  "jedi",
]
What’s going on here:
Helix has a built-in default language-servers setting for each language in its default
languages.toml file.
For Python, language-servers defaults to ["ty", "ruff", "jedi", "pylsp"].
What we’re doing in the custom languages.toml file above is overriding the default
language-servers setting for Python with one that replaces "ty" with
{ name = "ty", except-features = [ "completion" ] }: instead of just a string it’s now
an object that both enables the "ty" language server and sets except-features.
There’s also an only-features setting that can be used to restrict a language server
to only certain features, rather than disabling certain features individually, for example:
only-features = [ "format" ].
The full list of language server features that can be used in the except-features
and only-features lists is:
"format", "goto-definition", "goto-declaration", "goto-type-definition", "goto-reference", "goto-implementation", "signature-help", "hover", "document-highlight", "completion", "code-action", "workspace-command", "document-symbols", "workspace-symbols", "diagnostics", "rename-symbol", "inlay-hints"
(see Configuring Language Servers for a language in the Helix docs).
Signature help
When you’re typing out a function or method call Helix can show a helpful popup displaying the signature of the function/method: the arguments and their types (if known), an indication of which positional argument you’re currently typing, the return type, and the beginning of the docstring:
The signature help popup will normally appear on its own when needed.
If you do need to summon it manually there’s no keybinding for it by default,
but you can open Helix’s command palette with Space ?
then search for the signature_help command and hit Enter to run it.
Esc or Ctrl + c closes the signature help popup.
As with completions both ty and Jedi can generate signature help
but in this case Helix shows only one of them: whichever comes first
in the language-servers setting.
The docs say that Alt + n and Alt + p
change to the next and previous signatures, but this doesn’t seem to work.
I prefer Jedi’s signature help over ty’s but ty comes first in the default
language-servers setting so I disabled signature help from ty in my
languages.toml:
# languages.toml

[[language]]
name = "python"
language-servers = [
  {name = "ty", except-features = [ "completion", "signature-help" ]},
  "ruff",
  "jedi",
]
Diagnostics
Probably the second most popular LSP feature after autocomplete: language servers can provide diagnostics about your code (hints, warnings, errors, and other info from tools like linters and type checkers) which Helix can display in-editor:
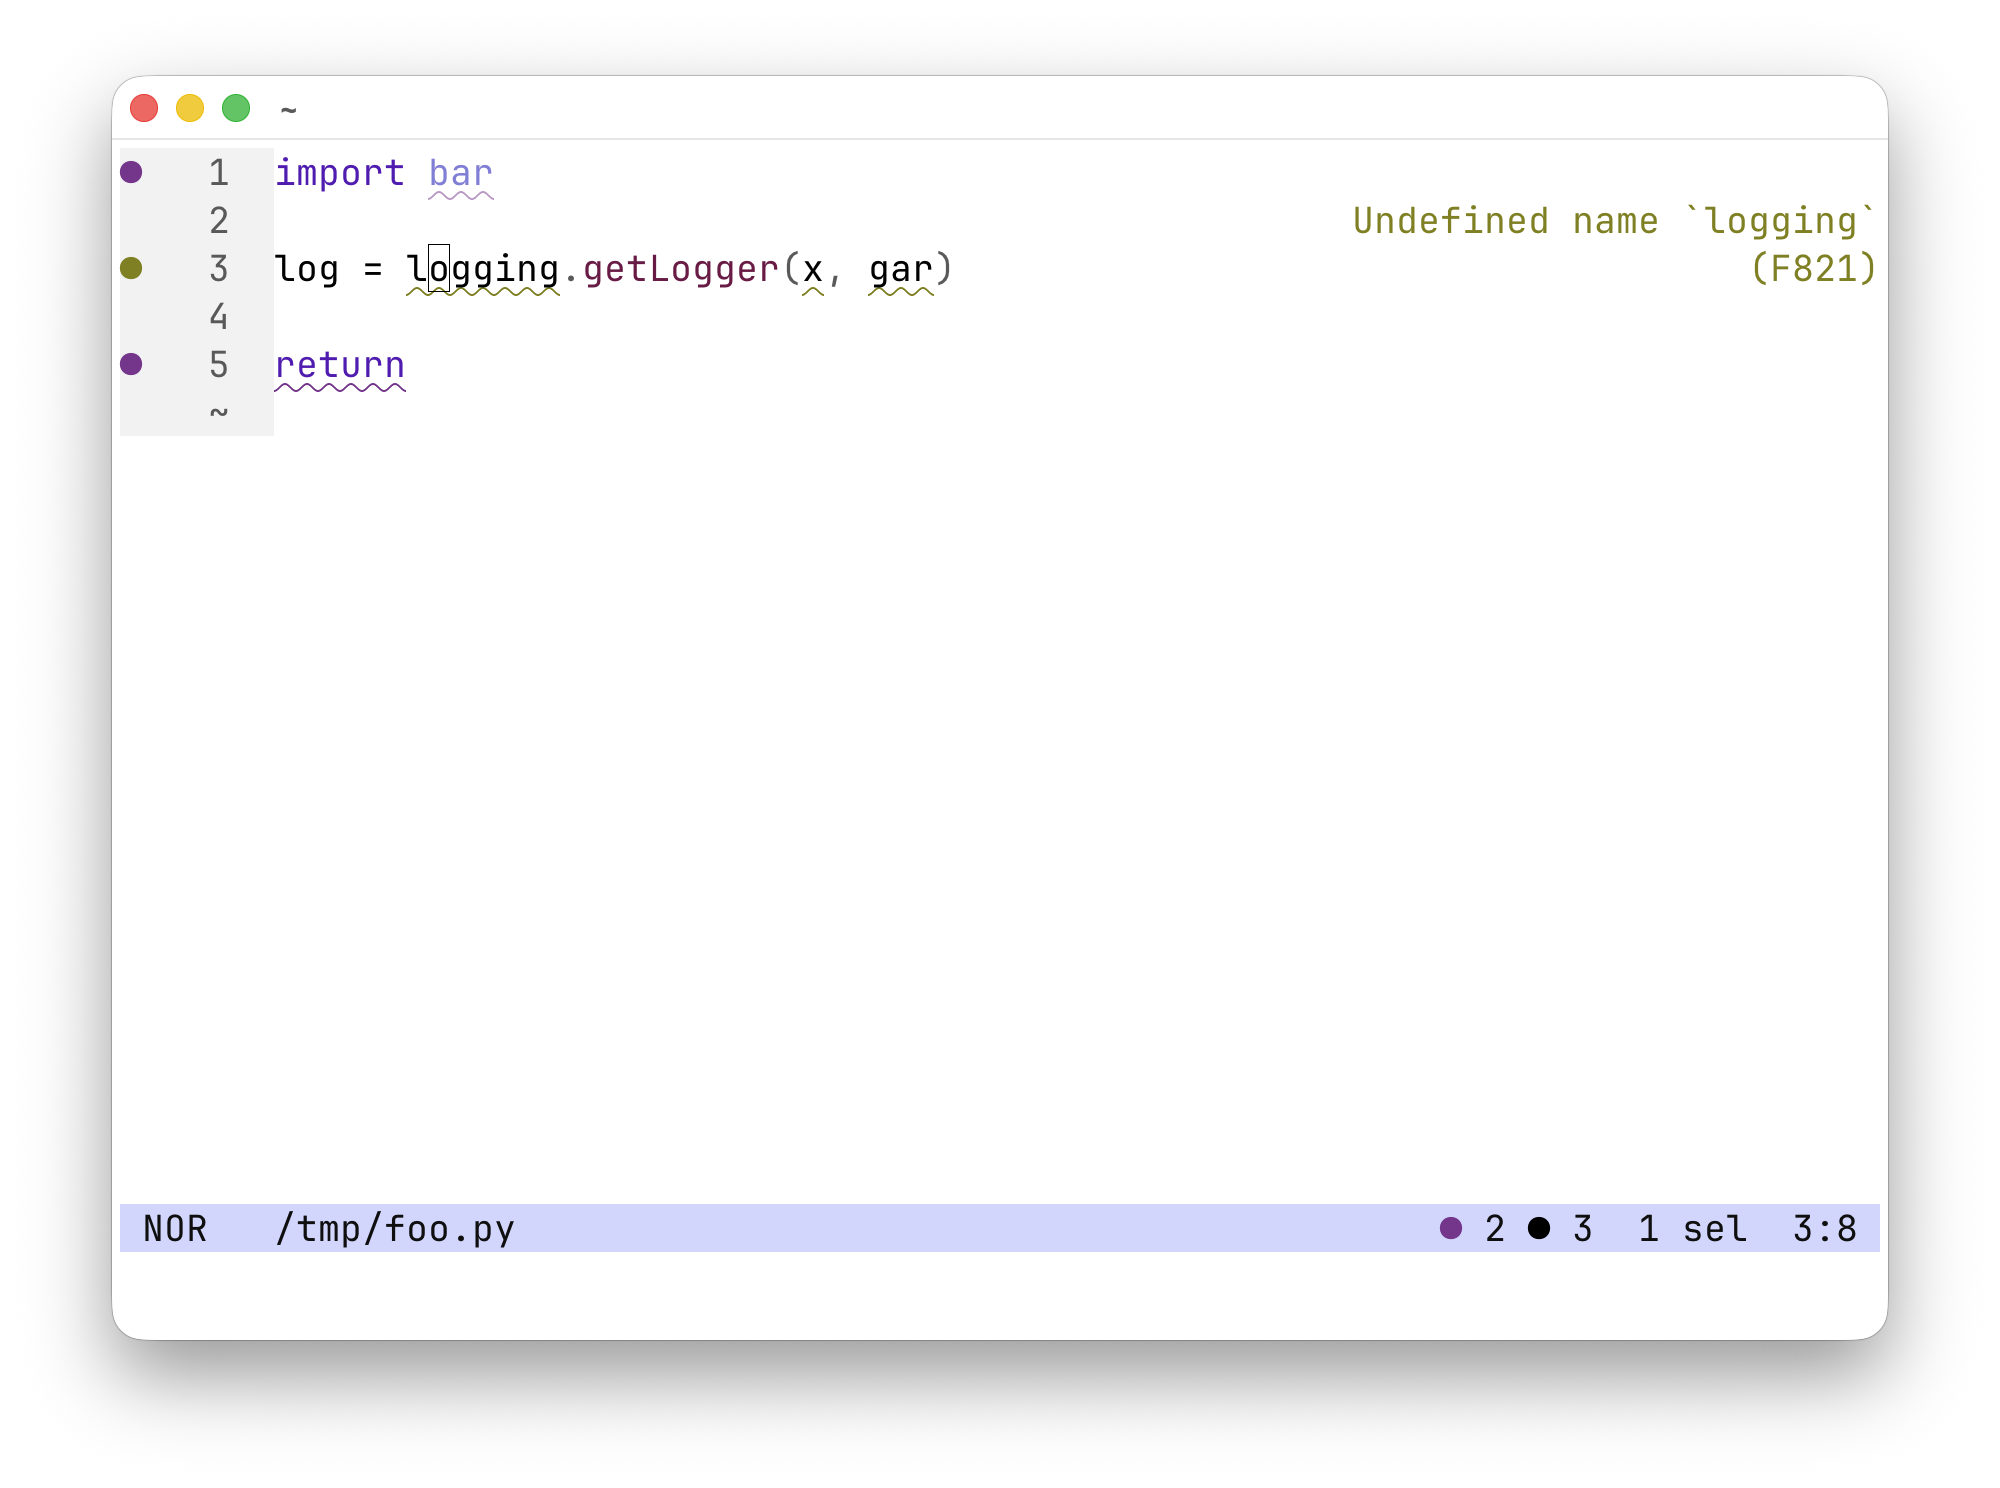
The presence of diagnostics is indicated by coloured circles next to the line numbers in the left-hand-side gutter and in the status line at the bottom, and by squiggly underlines under the suspect sections of code. By default the status line counts only warning and error-level diagnostics, and only for the current file (not the rest of the workspace). This is configurable. When the cursor is over one of the underlined sections the diagnostic message itself is displayed in the top-right, as can be seen in the screenshot above.
Some keyboard shortcuts for working with diagnostics:
- ]d / [d: jump to next/previous diagnostic
- ]D / [D: jump to first/last diagnostic
- There’s also a
:yank-diagnosticcommand (used via Helix’s command line that you enter with :) that copies the diagnostic message under the cursor to the system clipboard.
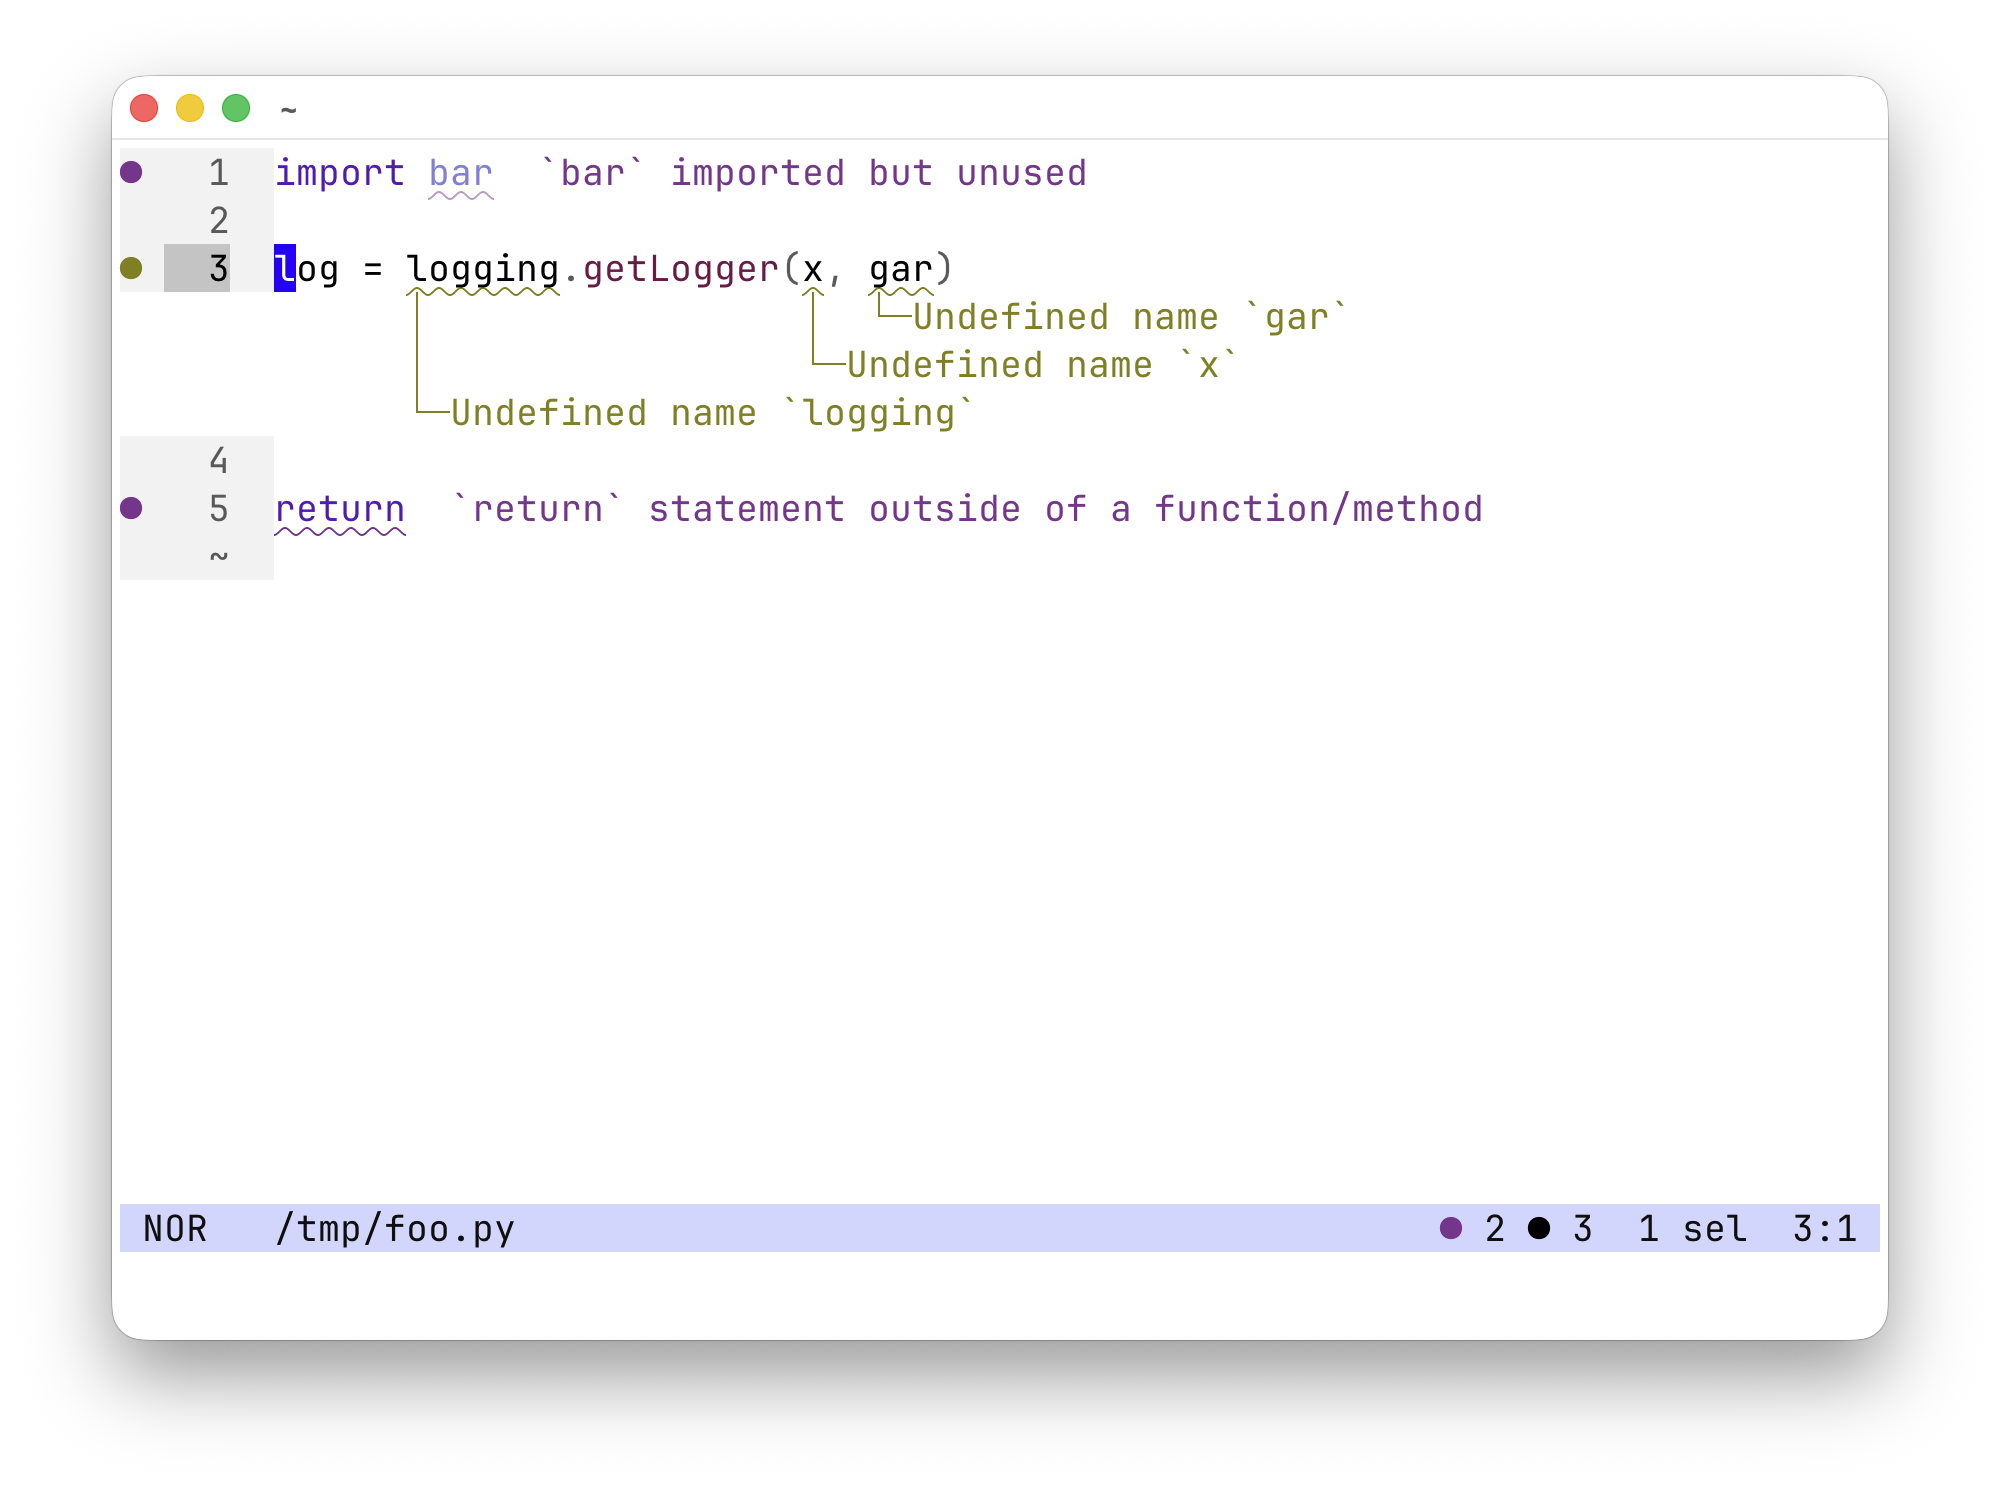
There’s optional support for displaying diagnostics inline and at the ends of lines, it looks like this:
Inline and end-of-line diagnostics are disabled by default.
To enable them create a Helix config file,
either a ~/.config/helix/config.toml file for global config
or a .helix/config.toml file in your project’s root directory for per-project config,
and add this to it:
# config.toml

[editor]
end-of-line-diagnostics = "hint"

[editor.inline-diagnostics]
cursor-line = "warning"
other-lines = "disable"
Tip: the command :config-open opens your Helix config file from within Helix.
:config-open-workspace opens the current project’s config file.
After editing the file :config-reload reloads the config.
Every diagnostic has a severity level of hint, info, warning or error.
You can choose what level a diagnostic must meet in order to be displayed inline or at the end of a line.
In the config above hint or higher diagnostics (i.e. all diagnostics) can be displayed at the ends of lines,
warning or higher can be displayed inline on the line that the cursor is currently at,
and no diagnostics can be displayed inline on other lines.
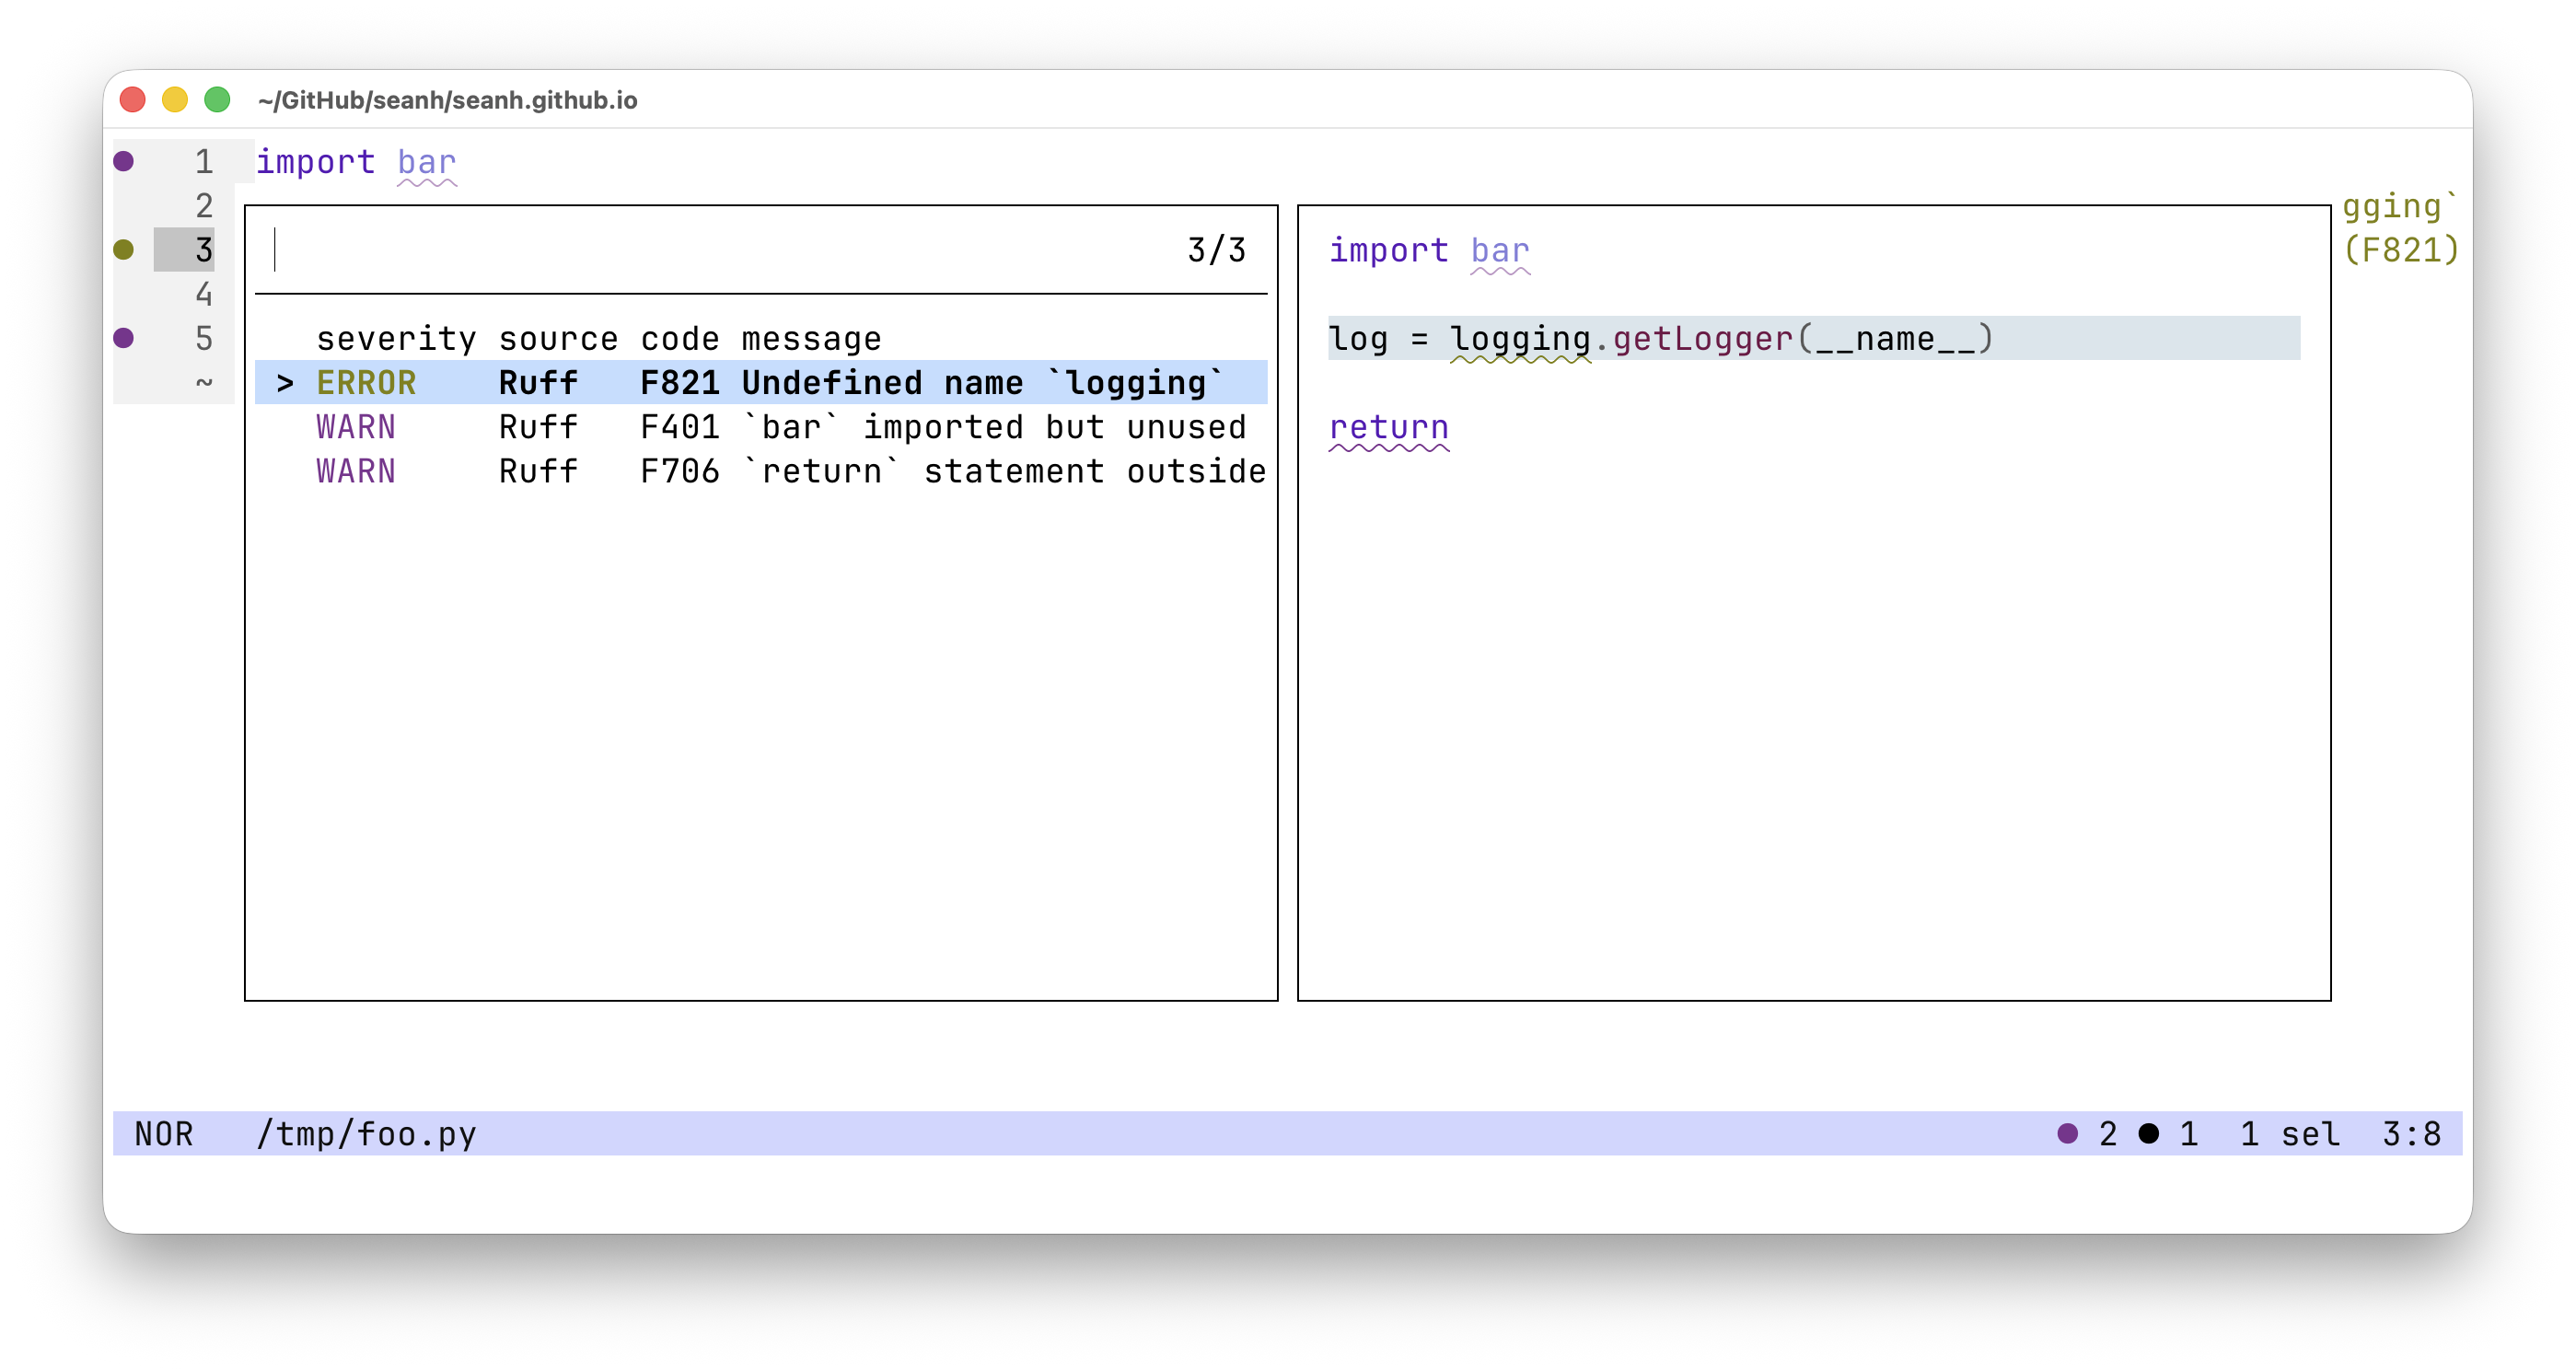
There’s also a diagnostics picker that gives a birds-eye overview of all diagnostics. Space d opens a picker for diagnostics from the current file only, Space D opens one for diagnostics from all files in the workspace:
“Workspace”?
Helix has a somewhat implicit and lightly documented concept of “the workspace” that several features rely on. For example Space e opens a file explorer in the “workspace root” directory. There are many more.
By default the workspace root seems to be the current working directory. But if
one of the CWD’s parent directories contains a file or directory like .git,
.svn or .helix then that parent directory will be taken as the workspace
root instead.
The picker shows the list of diagnostics in the left-hand pane and a preview of the currently selected diagnostic’s line in the right-hand pane.
Helix uses pickers like this for many purposes: opening files and browsing directories, global search, etc. Some keybindings for pickers:
- Type to enter a search term and filter the picker contents.
- There are several pairs of keybindings to move the selection up and down: ↑ and ↓, Tab and Shift + Tab, Ctrl + n and Ctrl + p, Page Up and Page Down, Ctrl + u and Ctrl + d, and Home and End.
- Enter closes the picker and jumps to the selected item.
- Ctrl + s opens the selected item in a horizontal split.
- Ctrl + v opens it in a vertical split.
- Alt + Enter opens the selected item without closing the picker, allowing you to open multiple files.
- Ctrl + t toggles the right-hand preview pane on and off, giving more space to the table of items in the left-hand pane.
- Close the picker with Esc or Ctrl + c.
Inlay hints
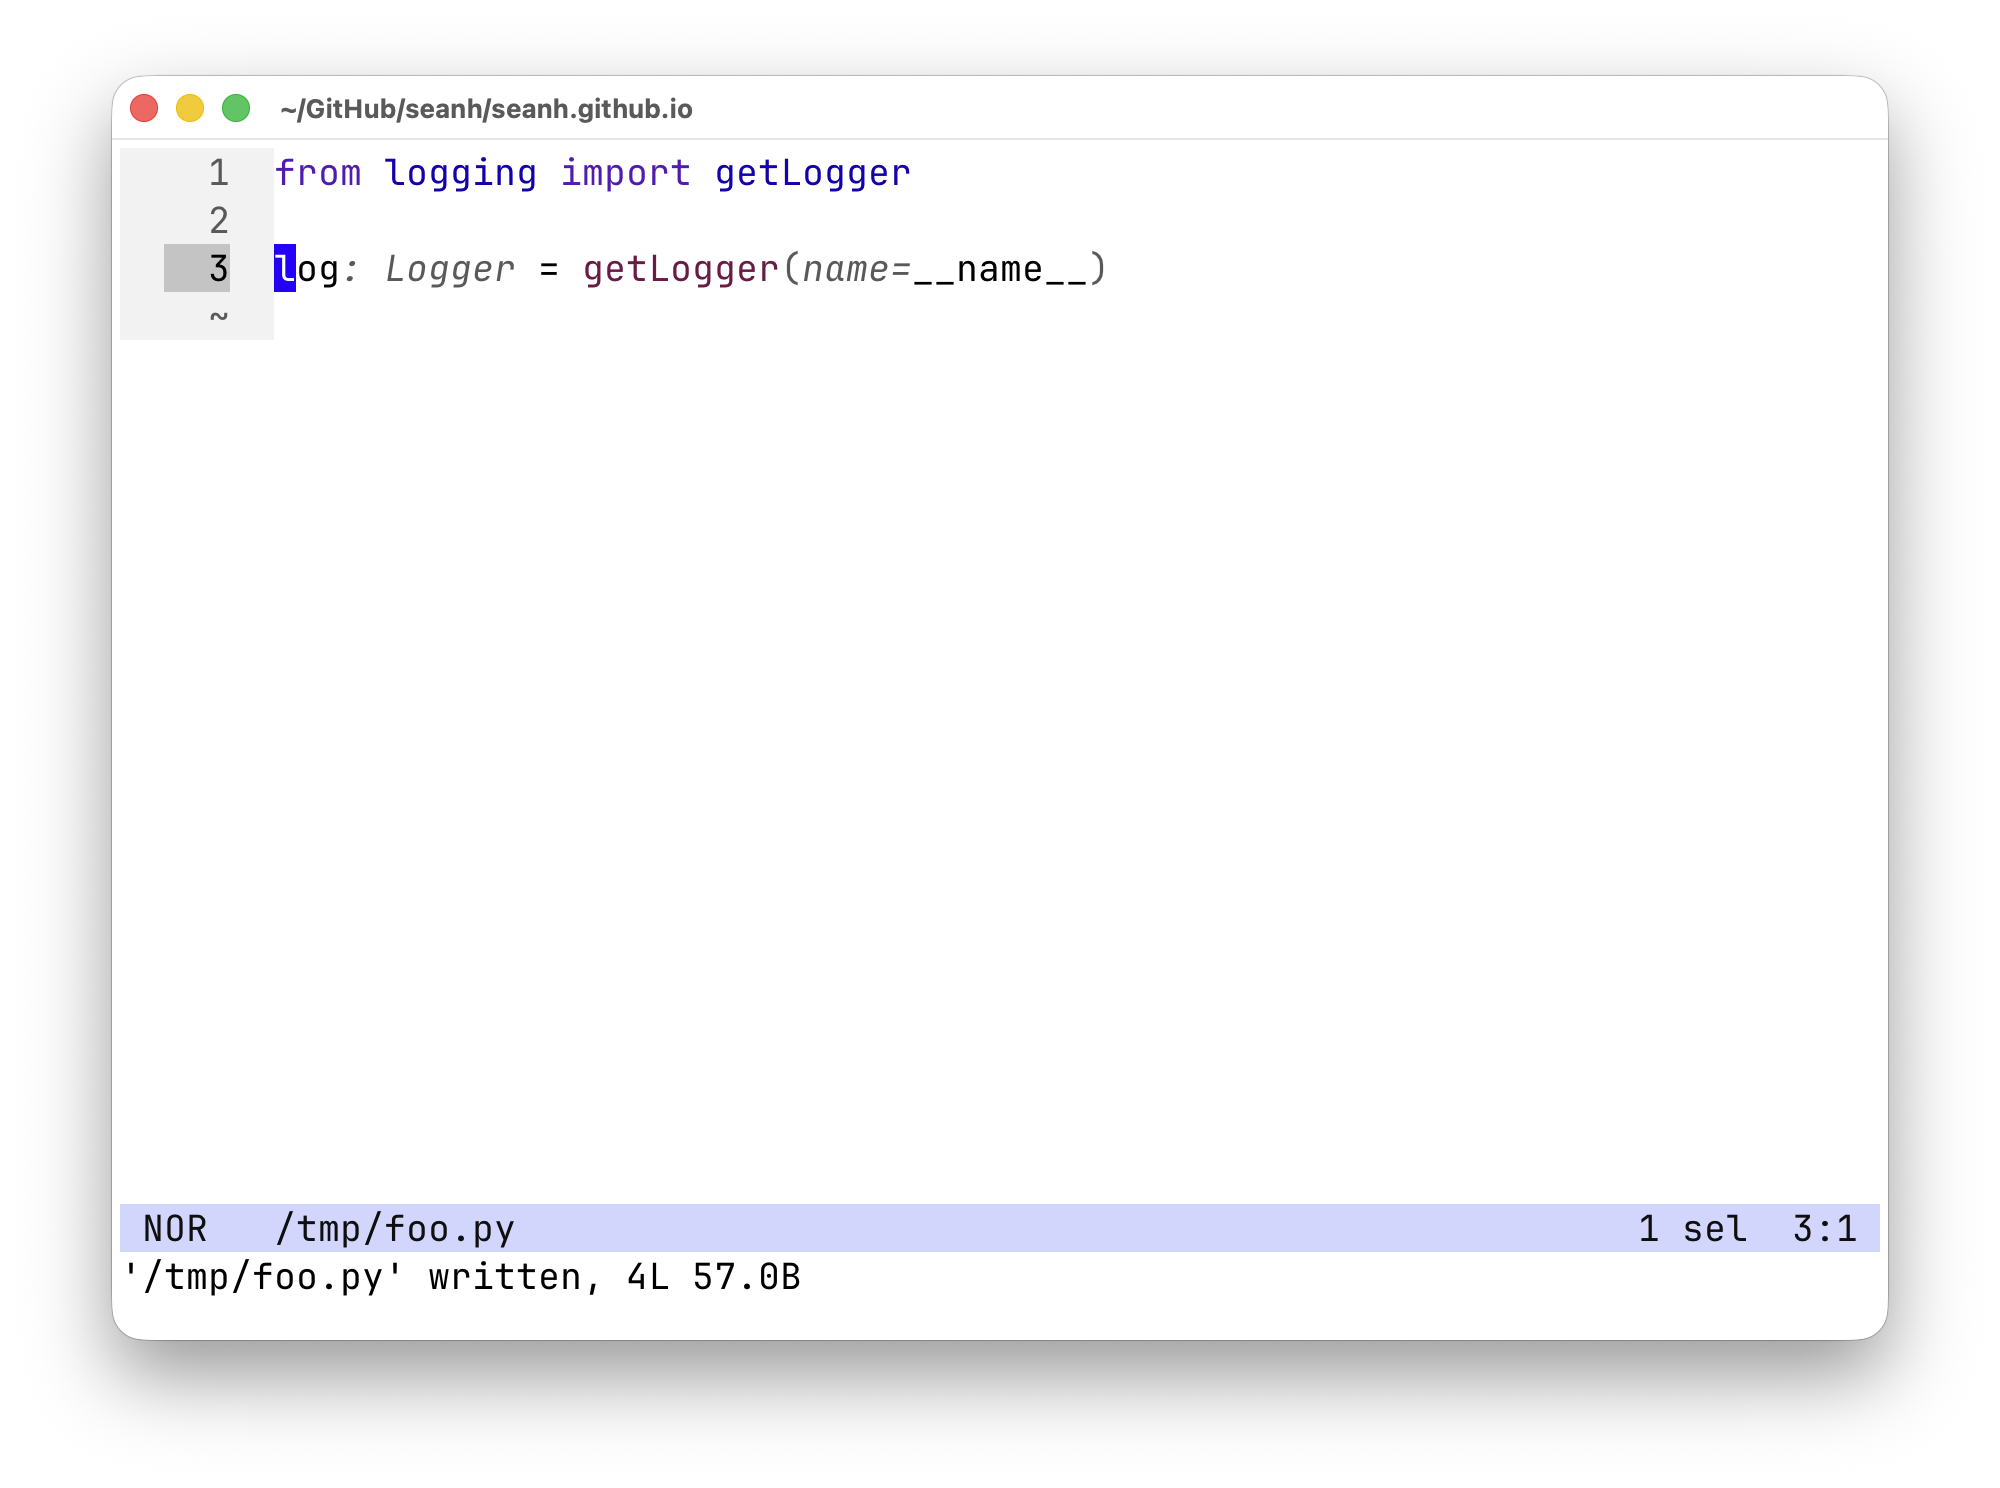
Language servers also support things called “inlay hints” that’re similar to inline diagnostics and are also disabled by default in Helix. Inlay hints annotate the source code with things like the types of variables and the names of arguments being passed positionally. It looks like this (the inlay hints are the words in italics, they’re not part of the actual file!):
Inlay hints are disabled by default. You can toggle them on and off with this command:
:toggle lsp.display-inlay-hints
To enable inlay hints when Helix starts up add this to your config file:
# config.toml

[editor.lsp]
display-inlay-hints = true
Code actions
Space a opens a menu of available language server “code actions” that you can apply: automated code changes that do things like organise code and fix diagnostic warnings.
For example the Ruff language server provides actions to sort the file’s imports,
to auto-fix all auto-fixable Ruff warnings in the file,
and if the cursor is over a Ruff diagnostic there are actions to ignore the diagnostic
by adding a # noqa comment or to fix just that diagnostic (if it’s auto-fixable by Ruff).
Jedi provides “extract expression into variable” and “extract expression into function” actions when the cursor is over a suitable expression.
Code formatting
In our case Python code formatting is provided by the Ruff language server.
To auto-format some Python code select the code and type =.
To auto-format an entire file type % to select the whole file
then hit =, or just run the :format or :fmt command on Helix’s command line.
You can also configure Helix to auto-format files whenever you save them. Add this to your config file:
# config.toml

[[language]]
name = "python"
auto-format = true
Helix will now auto-format the entire file whenever you save the file
with a command like :write / :w. Helix also has an auto-save feature
(disabled by default), it will not auto-format files when auto-saving them.
Navigation: go to definition, references, symbols
Language servers provide various commands for jumping to things:
-
gd jumps to the definition of the symbol under the cursor, whether that’s in the current file or another file.
-
gD jumps to the declaration of the symbol. With Jedi gD on an imported symbol will jump to the
importin the current file rather than jumping into the other file where the symbol is defined. With ty gD seems to do the same as gd. -
gi jumps to the implementation. I’m not sure how that would differ from the definition in Python. For me this doesn’t seem to work with either ty or Jedi: it just says “No definition found”.
-
gr opens a picker with a list of all references to the symbol under the cursor in all files in the workspace:
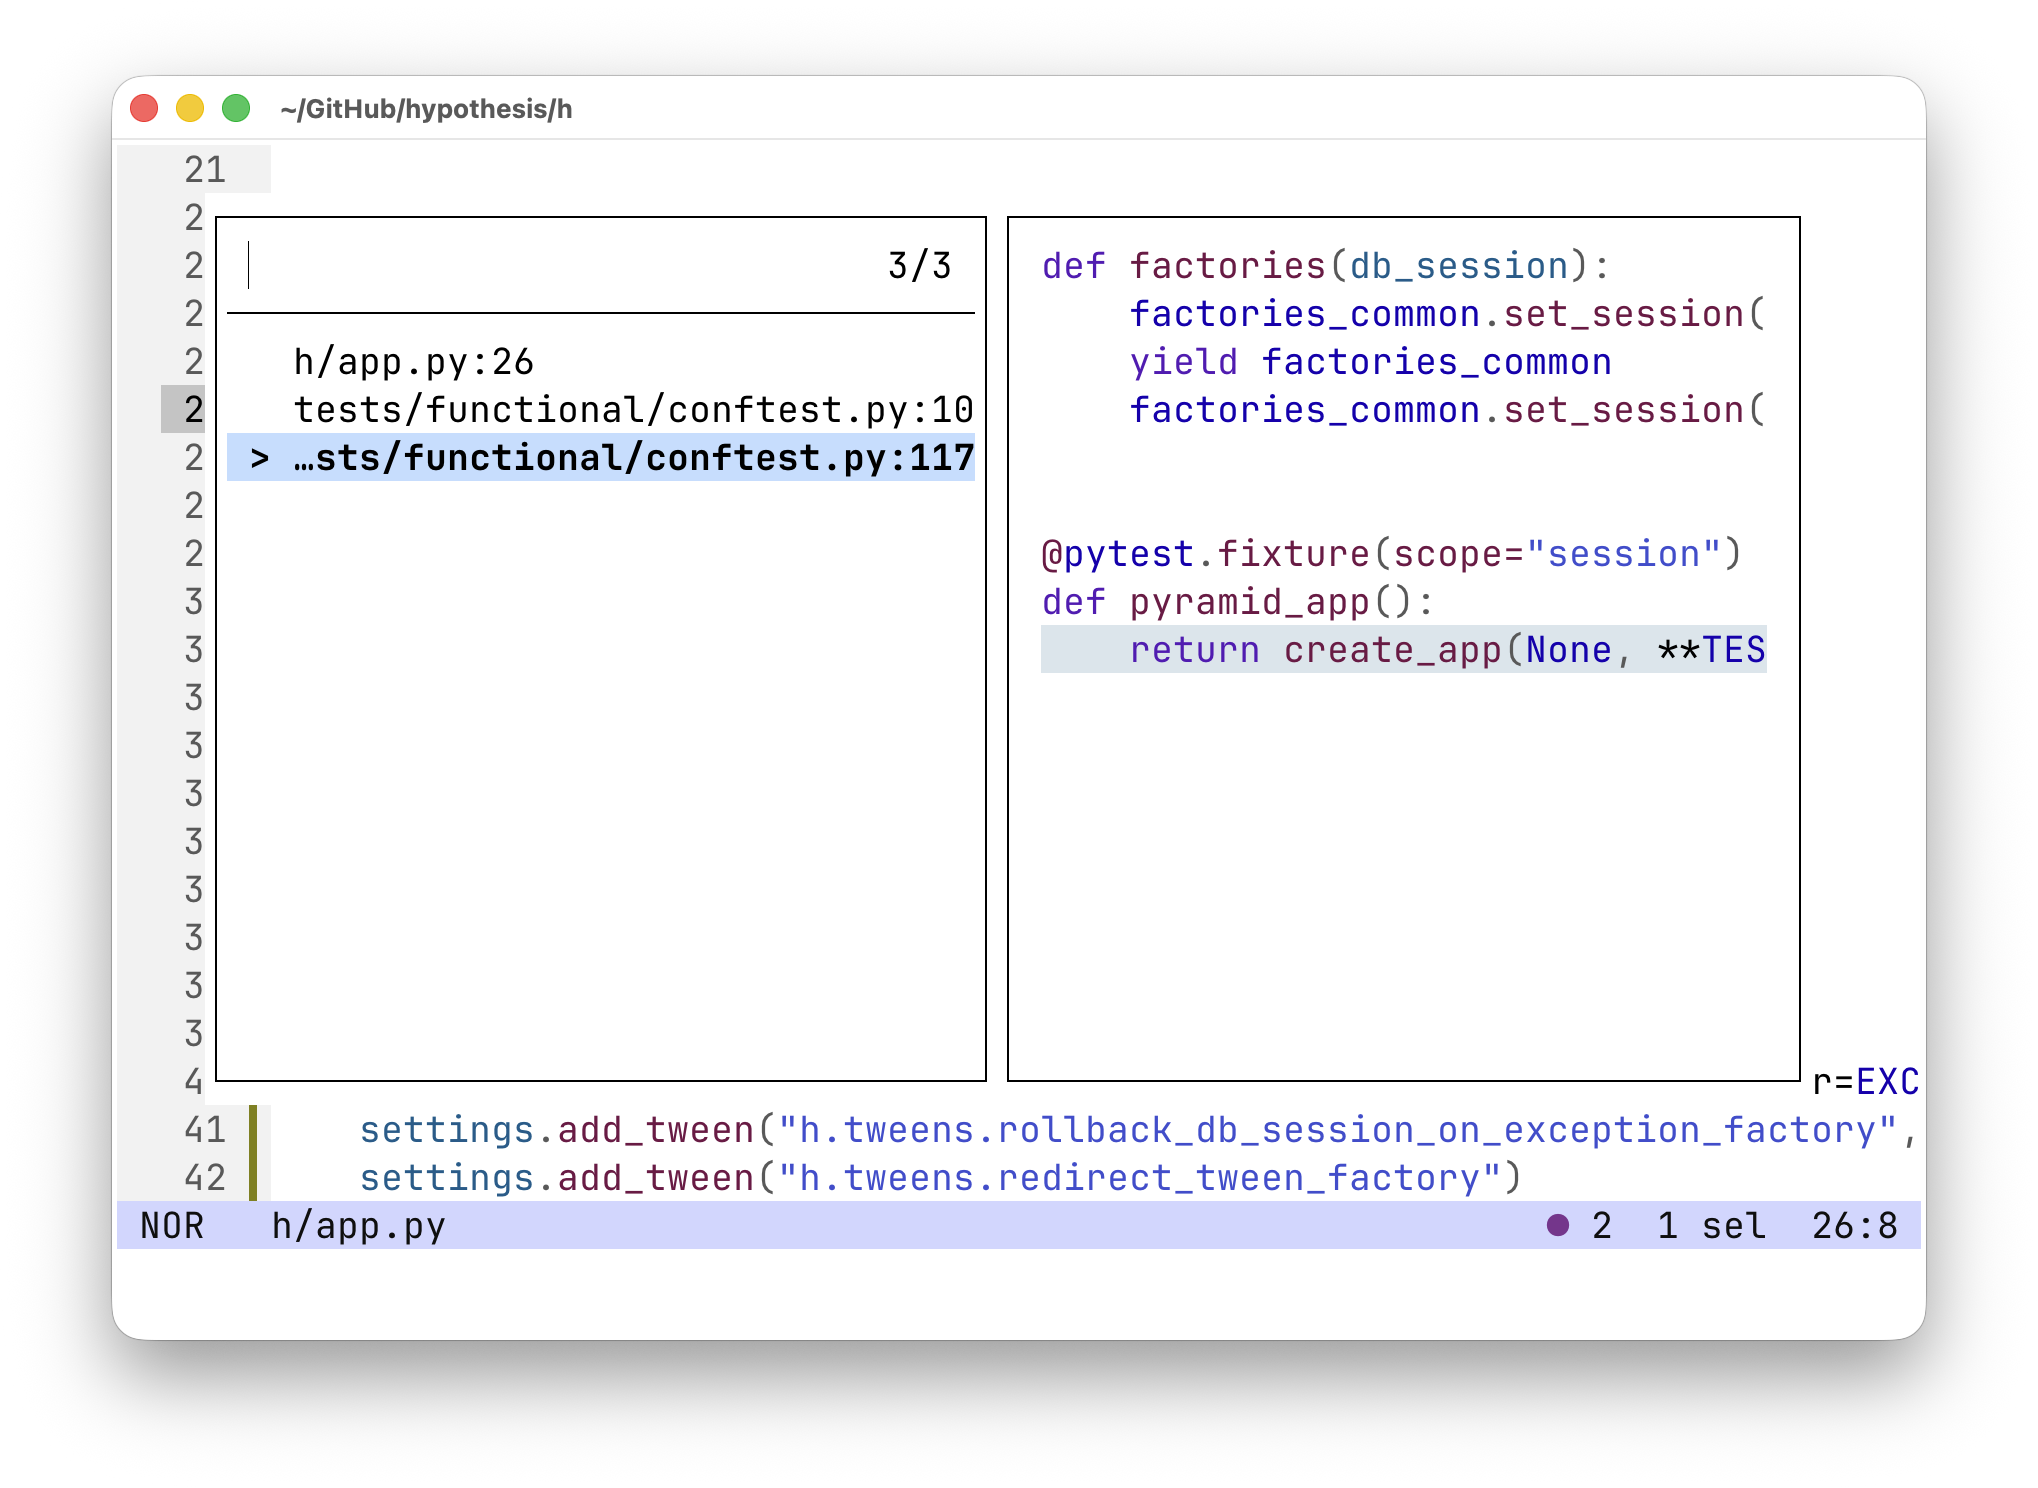
Helix’s picker showing all references to create_app(). -
Space s opens a similar picker but for all symbols in the current file, not just the symbol under the cursor.
-
Space S does the same for symbols across the entire workspace but the picker is initially empty: symbols only begin to appear once you start to enter a search query.
Again if you have multiple language servers enabled you’ll get doubled results from many of these navigation commands:
one from ty and one from Jedi. Helix will show the two results in a menu
and let you choose which one to jump to. If you don’t want that
you can disable the various goto-* and *-symbols features for one of the two
language servers in your languages.toml, for example:
# languages.toml

[[language]]
name = "python"
language-servers = [
  {name = "ty", except-features = ["goto-definition", "goto-declaration", "goto-type-definition", "goto-reference", "goto-implementation", "document-symbols", "workspace-symbols"]},
  "ruff",
  "jedi",
]
Selecting and renaming references
Space h selects all references to the symbol under the cursor in the current file. This uses Helix’s multi-cursor/multi-select support so you have to be familiar with that or it’ll be very confusing (there’s a multiple cursors tutorial on the Helix wiki). It lets you change, delete or otherwise edit all the references at once.
For example in this video I use Space h to select all references to the config argument
under the cursor then type c settings Esc
to rename them all to settings:
You can do much more with multiple cursors/selections,
but if all you want to do is rename all references to a symbol there’s an easier way: the rename_symbol command (keyboard shortcut: Space r)
will ask you for a new name for the symbol under the cursor
and then use the language server to rename all references to it.
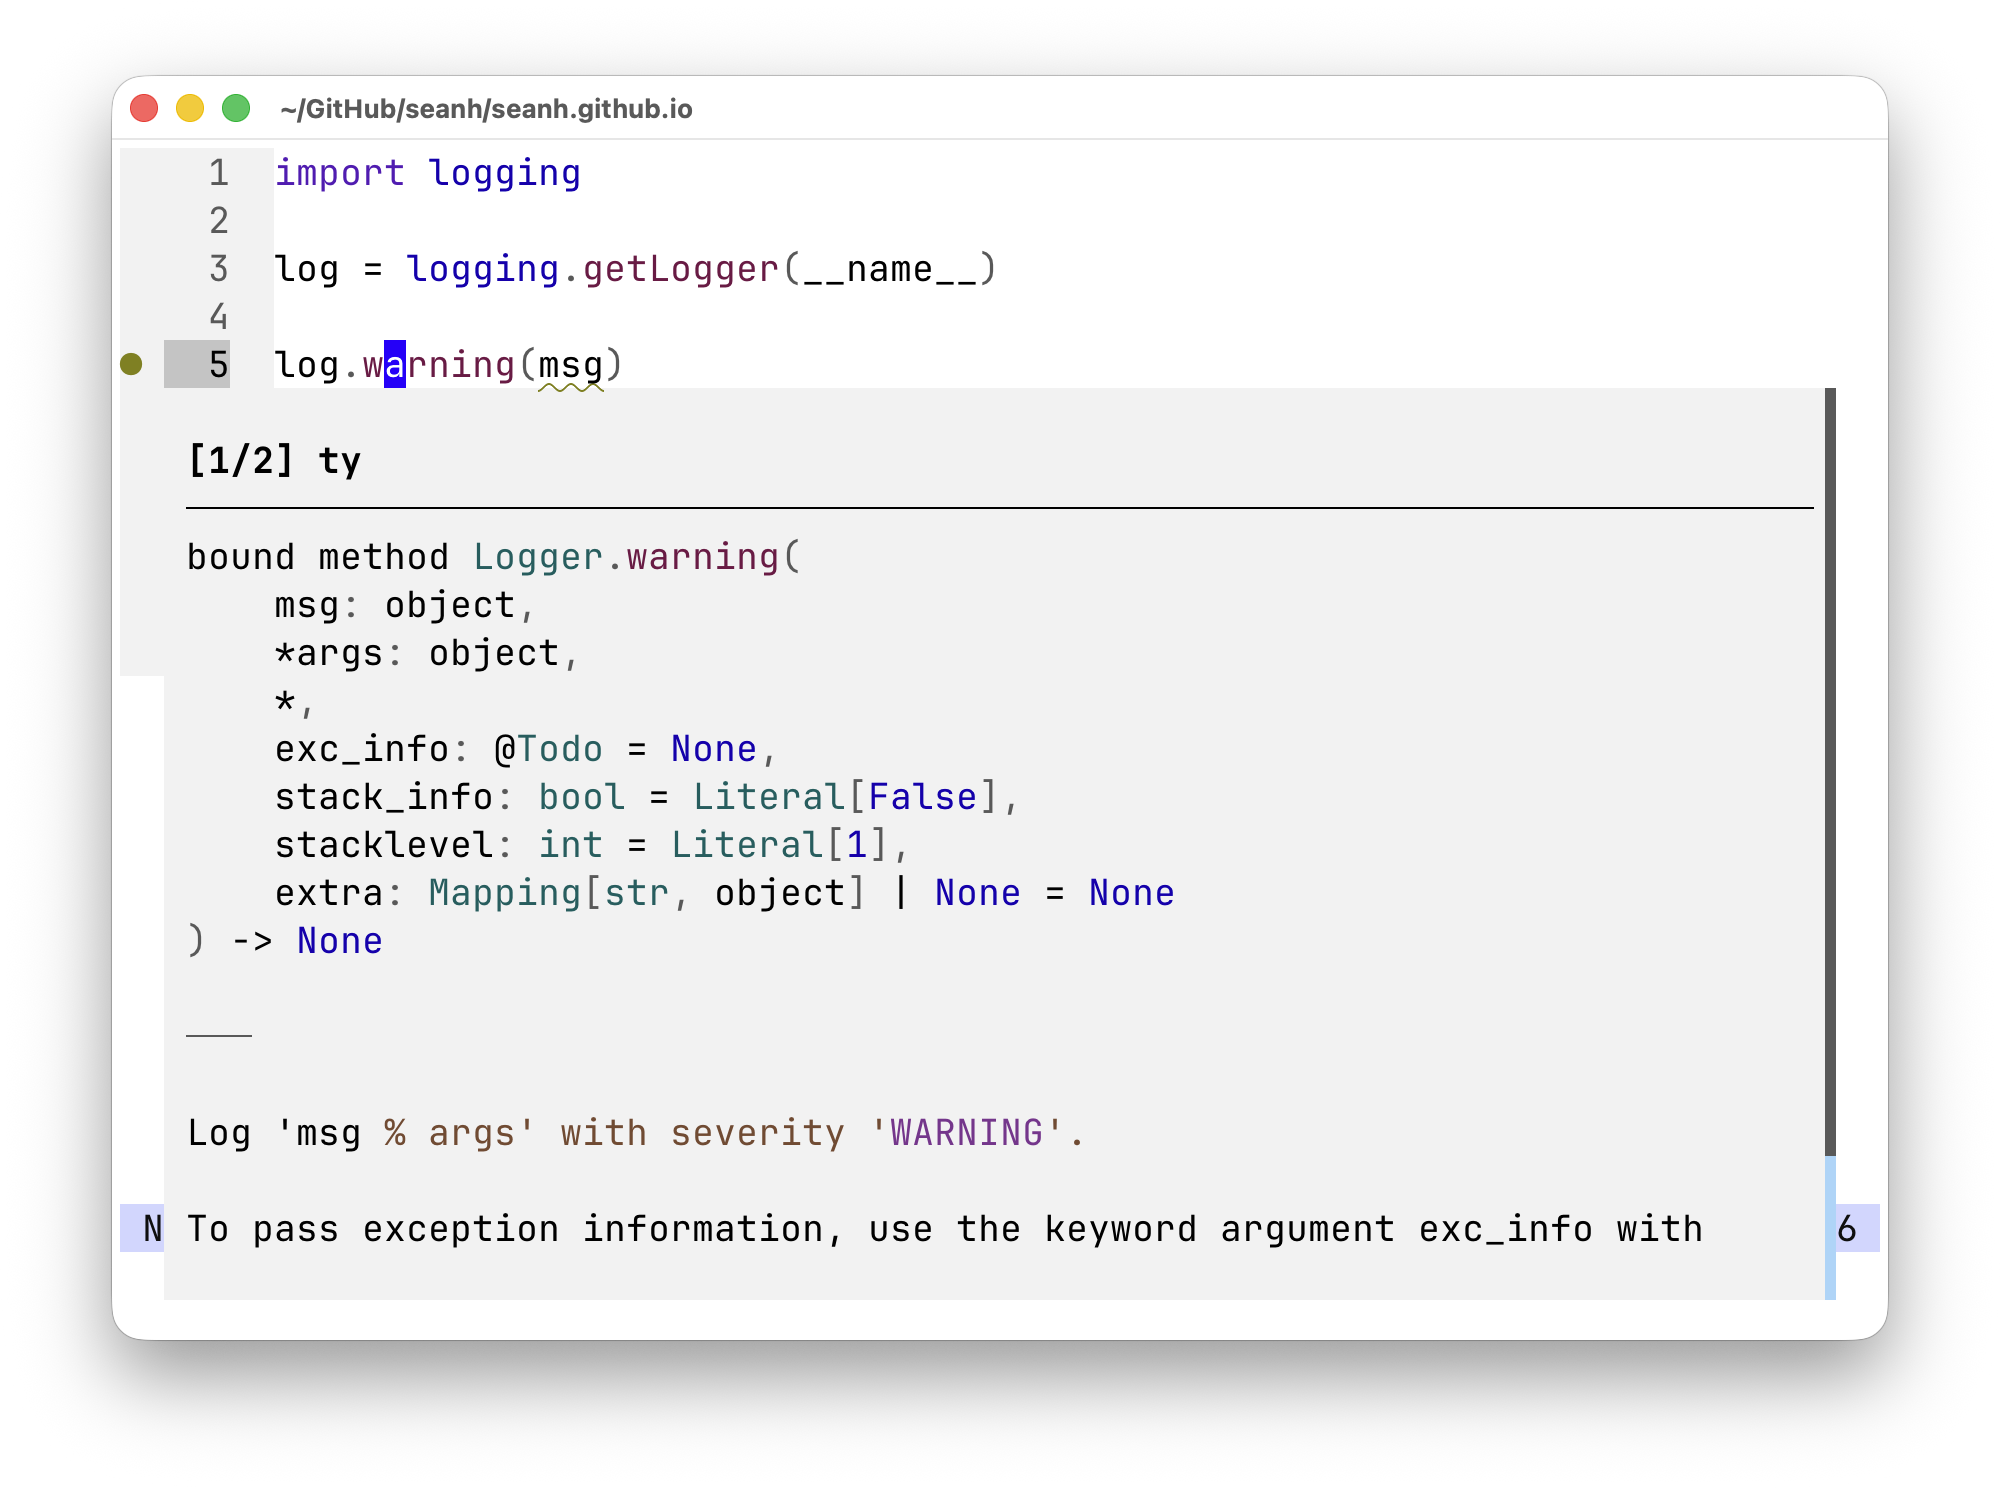
Documentation
Finally, Space k shows the docs for the symbol under the cursor in a popup window:
Ctrl + d and Ctrl + u scroll the contents of the popup window up and down. You can also use the scroll-wheel or track-pad.
Esc or Ctrl + c closes the popup.
If you have multiple language servers enabled you may get multiple documentation results,
as indicated by the [1/2] ty in my screenshot indicating that there
are two results available and the one currently displayed is from ty.
Alt + n and Alt + p page through the different results.
As with other LSP features, you can disable documentation popups
from one of the language servers by adding "hover" to its
except-features setting in languages.toml.